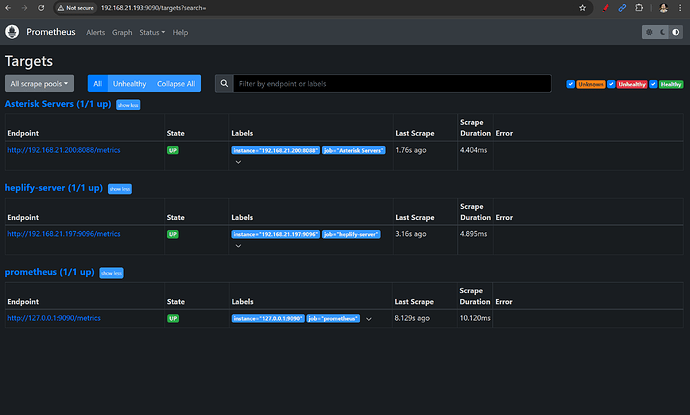
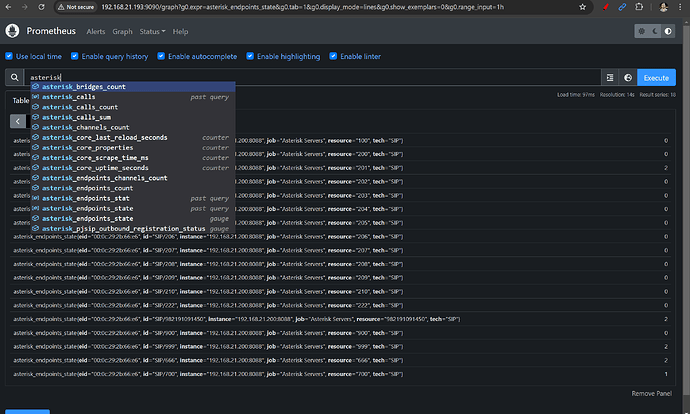
برای نصب پرومتئوس ابتدا یک گروه به اسم prometheus میسازیم.
sudo groupadd --system prometheus
اضافه کردن یک کاربر و اختصاص آن به گروه ایجاد شده بدون دسترسی به ورود
sudo useradd -s /sbin/nologin --system -g prometheus prometheus
ایجاد دایرکتوری برای یوزر prometheus:
sudo mkdir /etc/prometheus
sudo mkdir /var/lib/prometheus
دانلود Prometheus Monitoring
curl -s https://api.github.com/repos/prometheus/prometheus/releases/latest|grep browser_download_url|grep linux-amd64|cut -d '"' -f 4|wget -qi -
اکسترکت فایل فشرده Prometheus
tar -xvf prometheus-2.54.1.linux-amd64.tar.gz
انتقال فایلهای اکسترکت شده به دایرکتوریهایی که قبلاً ایجاد کردهایم
sudo mv prometheus-2.54.1.linux-amd64 /etc/prometheus
اکنون دسترسی های دایرکتوریها را به کاربر Prometheus اختصاص دهید
sudo chown prometheus:prometheus /etc/prometheus
sudo chown prometheus:prometheus /var/lib/prometheus
sudo chown -R prometheus:prometheus /etc/prometheus/consoles
sudo chown -R prometheus:prometheus /etc/prometheus/console_libraries
پیکربندی فایلها و اسکریپت Prometheus
sudo cp /etc/prometheus/prometheus /usr/local/bin/
sudo cp /etc/prometheus/promtool /usr/local/bin/
حالا باید Prometheus را systemd کنیم تا آن را به عنوان یک سرویس داشته باشیم
sudo nano /etc/systemd/system/prometheus.service
محتوای systemd برای prometheus
[Unit]
Description=Prometheus
Documentation=https://prometheus.io/docs/introduction/overview/
Wants=network-online.target
After=network-online.target

[Service]
User=prometheus
Group=prometheus
Type=simple
ExecStart=/usr/local/bin/prometheus \
--config.file /etc/prometheus/prometheus.yml \
--storage.tsdb.path /var/lib/prometheus/ \
--web.console.templates=/etc/prometheus/consoles \
--web.console.libraries=/etc/prometheus/console_libraries

[Install]
WantedBy=multi-user.target
شروع و فعالسازی Prometheus
sudo systemctl daemon-reload
sudo systemctl enable --now prometheus
وضعیت سرویس را بررسی کنید
systemctl status prometheus
دسترسی به وب پرومتئوس
http://server-ip-address:9090
حالا باید روی سرور IP-PBX خود Node Exporter را نصب کرده و یک Job روی پرومتئوس برای دریافت دیتای دلخواه بسازیم.
برای نصب Node Exporter اول آن را دانلود میکنیم.
curl -s https://api.github.com/repos/prometheus/node_exporter/releases/latest| grep browser_download_url|grep linux-amd64|cut -d '"' -f 4|wget -qi -
اکسترکت فایل دانلود شده
tar -xvf node_exporter-*.linux-amd64.tar.gz
انتقال فایل سرویس Node Exporter به دایرکتوری bin
sudo mv node_exporter-*.linux-amd64/node_exporter /usr/local/bin/
ایجاد یک یوزر برای اجرای سرویس Node Exporter
sudo useradd -rs /bin/false node_exporter
Node Exporter را systemd میکنیم
sudo nano /etc/systemd/system/node_exporter.service
محتوای systemd برای Node Exporter
[Unit]
Description=Node Exporter
After=network.target

[Service]
User=node_exporter
Group=node_exporter
Type=simple
ExecStart=/usr/local/bin/node_exporter

[Install]
WantedBy=multi-user.target
شروع و فعالسازی سرویس
sudo systemctl daemon-reload
sudo systemctl enable --now node_exporter
وضعیت سرویس
systemctl status node_exporter
اضافه کردن آدرس IP ماشین هدف در فایل prometheus.yml
وارد Debian شوید که prometheus روی آن اجرا میشود و فایل YML آن را ویرایش کنید
sudo nano /etc/prometheus/prometheus.yml
سپس بخش job prometheus را ویرایش کنید
- job_name: 'node_exporter_metrics'
     static_configs:
      - targets: ["Target-IP:9090"]
چک کردن فایل prometheus.yml
promtool check config /etc/prometheus/prometheus.yml
راهاندازی مجدد سرور Prometheus
sudo systemctl restart prometheus
وضعیت سرویس را بررسی کنید
systemctl status prometheus
مانیتورینگ ماشین مد نظر
http://server-ip-address:9090/targets
حالا باید 3 فایل را ادیت کنیم
فایل اول prometheus.yml در سرور پرومتئوس می باشد.
# my global config
global:
  scrape_interval: 15s # Set the scrape interval to every 15 seconds. Default is every 1 minute.
  evaluation_interval: 15s # Evaluate rules every 15 seconds. The default is every 1 minute.
  # scrape_timeout is set to the global default (10s).

# Alertmanager configuration
alerting:
  alertmanagers:
    - static_configs:
        - targets:
          # - alertmanager:9093

# Load rules once and periodically evaluate them according to the global 'evaluation_interval'.
rule_files:
  # - "first_rules.yml"
  # - "second_rules.yml"

# A scrape configuration containing exactly one endpoint to scrape:
# Here it's Prometheus itself.
scrape_configs:
  # The job name is added as a label `job=<job_name>` to any timeseries scraped from this config.
  - job_name: "prometheus"
    static_configs:
     - targets:  ["127.0.0.1:9090"]

  - job_name: "Asterisk Servers"
    static_configs:
     - targets:  ["IPPBX-Server:8088"]
فایل دوم در سرور IP-PBX و در مسیر
/etc/asterisk/prometheus.conf
میباشد که محتوای آن را به شکل زیر ادیت میکنیم.
;
; res_prometheus Module configuration for Asterisk
;

;
; This configuration file is consumed by res_prometheus, which
; provides the functionality for serving up Asterisk statistics to a
; Prometheus server.
;
; Because Prometheus scrapes statistics from HTTP servers, this module requires
; Asterisk's built-in HTTP server to be enabled and configured properly.
;
; Module Dependencies:
; only if Asterisk is build with pjproject bundled (default)
; * res_pjsip.so
; * res_pjsip_outbound_registration.so

; Settings that affect all statistic generation
[general]
enabled = yes                      ; Enable/disable all statistic generation.
                                  ; Default is "no", as enabling this without
                                  ; proper securing of your Asterisk system
                                  ; may result in external systems learning
                                  ; a lot about your Asterisk system.
                                  ; Note #1: If Asterisk's HTTP server is
                                  ; disabled, this setting won't matter.
                                  ; Note #2: It is highly recommended that you
                                  ; set up Basic Auth and configure your
                                  ; Prometheus server to authenticate with
                                  ; Asterisk. Failing to do so will make it easy
                                  ; for external systems to scrape your Asterisk
                                  ; instance and learn things about your system
                                  ; that you may not want them to. While the
                                  ; metrics exposed by this module do not
                                  ; necessarily contain information that can
                                  ; lead to an exploit, an ounce of prevention
                                  ; goes a long way. Particularly for those out
                                  ; there who are exceedingly lax in updating
                                  ; your Asterisk system. You are updating on a
                                  ; regular cadence, aren't you???
core_metrics_enabled = yes        ; Enable/disable core metrics. Core metrics
                                  ; include various properties such as the
                                  ; version of Asterisk, uptime, last reload
                                  ; time, and the overall time it takes to
                                  ; scrape metrics. Default is "yes"
uri = metrics                     ; The HTTP route to expose metrics on.
                                  ; Default is "metrics".

 ;auth_username = Asterisk        ; If provided, Basic Auth will be enabled on
                                  ; the metrics route. Failure to provide both
                                  ; auth_username and auth_password will result
                                  ; in a module load error.
 ;auth_password = Rf52Gfg8GspqG                 ; The password to use for Basic Auth. Note
                                  ; that I'm leaving this blank to prevent
                                  ; you from merely uncommenting the line and
                                  ; running with a config provided password.
                                  ; Because yes, people actually *do* that.
                                  ; I mean, if you're going to do that, just
                                  ; run unsecured. Fake security is usually
                                  ; worse than no security.
; auth_realm =                    ; Realm to use for authentication. Defaults
                                  ; to Asterisk Prometheus Metrics
که میتوانیم با تنظیمات مدنظر خود احراز هویت را هم راه اندازی کنیم.
فایل سوم http.conf در استریسک می باشد که در مسیر
/etc/asterisk/prometheus.conf
می باشد.
محتوای آن به شکل زیر ادیت میشود.
;
; Asterisk Built-in mini-HTTP server
;
;
; Note about Asterisk documentation:
;   If Asterisk was installed from a tarball, then the HTML documentation should
;   be installed in the static-http/docs directory which is
;   (/var/lib/asterisk/static-http/docs) on linux by default.  If the Asterisk
;   HTTP server is enabled in this file by setting the "enabled", "bindaddr",
;   and "bindport" options, then you should be able to view the documentation
;   remotely by browsing to:
;       http://<server_ip>:<bindport>/static/docs/index.html
;
[general]
;
; The name of the server, advertised in both the Server field in HTTP
; response message headers, as well as the <address /> element in certain HTTP
; response message bodies. If not furnished here, "Asterisk/{version}" will be
; used as a default value for the Server header field and the <address />
; element. Setting this property to a blank value will result in the omission
; of the Server header field from HTTP response message headers and the
; <address /> element from HTTP response message bodies.
;
servername=Asterisk
;
; Whether HTTP/HTTPS interface is enabled or not.  Default is no.
; This also affects manager/rawman/mxml access (see manager.conf)
;
enabled=yes
;
; Address to bind to, both for HTTP and HTTPS. You MUST specify
; a bindaddr in order for the HTTP server to run. There is no
; default value.
;
bindaddr=0.0.0.0
;
; Port to bind to for HTTP sessions (default is 8088)
;
bindport=8088
;
; Prefix allows you to specify a prefix for all requests
; to the server.  The default is blank.  If uncommented
; all requests must begin with /asterisk
;
;prefix=asterisk
;
; sessionlimit specifies the maximum number of httpsessions that will be
; allowed to exist at any given time. (default: 100)
;
;sessionlimit=100
;
; session_inactivity specifies the number of milliseconds to wait for
; more data over the HTTP connection before closing it.
;
; Default: 30000
;session_inactivity=30000
;
; session_keep_alive specifies the number of milliseconds to wait for
; the next HTTP request over a persistent connection.
;
; Set to 0 to disable persistent HTTP connections.
; Default: 15000
;session_keep_alive=15000
;
; Whether Asterisk should serve static content from static-http
; Default is no.
;
;enable_static=yes
;
; Whether Asterisk should serve a status page showing the running
; configuration of this built-in HTTP server.
; Default is yes.
;
;enable_status=no
;
; Redirect one URI to another.  This is how you would set a
; default page.
;   Syntax: redirect=<from here> <to there>
; For example, if you are using the Asterisk-gui,
; it is convenient to enable the following redirect:
;
;redirect = / /static/config/index.html
;
; HTTPS support. In addition to enabled=yes, you need to
; explicitly enable tls, define the port to use,
; and have a certificate somewhere.
;tlsenable=yes          ; enable tls - default no.
;tlsbindaddr=0.0.0.0:8089    ; address and port to bind to - default is bindaddr and port 8089.
;
;tlscertfile=</path/to/certificate.pem>  ; path to the certificate file (*.pem) only.
;tlsprivatekey=</path/to/private.pem>    ; path to private key file (*.pem) only.
; If no path is given for tlscertfile or tlsprivatekey, default is to look in current
; directory. If no tlsprivatekey is given, default is to search tlscertfile for private key.
;
; To produce a certificate you can e.g. use openssl. This places both the cert and
; private in same .pem file.
; openssl req -new -x509 -days 365 -nodes -out /tmp/foo.pem -keyout /tmp/foo.pem
;
; tlscipher=                             ; The list of allowed ciphers
;                                        ; if none are specified the following cipher
;                                        ; list will be used instead:
; ECDHE-RSA-AES128-GCM-SHA256:ECDHE-ECDSA-AES128-GCM-SHA256:ECDHE-RSA-AES256-GCM-SHA384:
; ECDHE-ECDSA-AES256-GCM-SHA384:DHE-RSA-AES128-GCM-SHA256:DHE-DSS-AES128-GCM-SHA256:
; kEDH+AESGCM:ECDHE-RSA-AES128-SHA256:ECDHE-ECDSA-AES128-SHA256:ECDHE-RSA-AES128-SHA:
; ECDHE-ECDSA-AES128-SHA:ECDHE-RSA-AES256-SHA384:ECDHE-ECDSA-AES256-SHA384:
; ECDHE-RSA-AES256-SHA:ECDHE-ECDSA-AES256-SHA:DHE-RSA-AES128-SHA256:DHE-RSA-AES128-SHA:
; DHE-DSS-AES128-SHA256:DHE-RSA-AES256-SHA256:DHE-DSS-AES256-SHA:DHE-RSA-AES256-SHA:
; AES128-GCM-SHA256:AES256-GCM-SHA384:AES128-SHA256:AES256-SHA256:AES128-SHA:AES256-SHA:
; AES:CAMELLIA:DES-CBC3-SHA:!aNULL:!eNULL:!EXPORT:!DES:!RC4:!MD5:!PSK:!aECDH:
; !EDH-DSS-DES-CBC3-SHA:!EDH-RSA-DES-CBC3-SHA:!KRB5-DES-CBC3-SHA
;
; tlsdisablev1=yes                ; Disable TLSv1 support - if not set this defaults to "yes"
; tlsdisablev11=yes               ; Disable TLSv1.1 support - if not set this defaults to "no"
; tlsdisablev12=yes               ; Disable TLSv1.2 support - if not set this defaults to "no"
;
; tlsservercipherorder=yes        ; Use the server preference order instead of the client order
;                                 ; Defaults to "yes"
;
; The post_mappings section maps URLs to real paths on the filesystem.  If a
; POST is done from within an authenticated manager session to one of the
; configured POST mappings, then any files in the POST will be placed in the
; configured directory.
;
;[post_mappings]
;
; NOTE: You need a valid HTTP AMI mansession_id cookie with the manager
; config permission to POST files.
;
; In this example, if the prefix option is set to "asterisk", then using the
; POST URL: /asterisk/uploads will put files in /var/lib/asterisk/uploads/.
;uploads = /var/lib/asterisk/uploads/
;
در آخر ماژول res_prometheus.so را load کرده و در محیط پرومتئوس موارد مورد نیاز خود از استریسک را مانیتور میکنیم.

